Accurate calibration of weighing scales is needed for regulatory compliance and high product quality. In pharmaceuticals and food processing industries, precise weight measurements are required to meet legal standards and avoid costly issues like recalls and fines.
While ISO 9001 emphasises “Measurement Traceability,” regular weighing scale calibration also helps detect mistakes early.
This article will walk you through the steps to properly calibrate your digital scales, helping your business stay compliant and maintain accuracy across all operations.
Calibration is adjusting a scale to ensure it measures weight accurately. This is done by placing a standard calibration mass on the scale and adjusting it until the scale reads the precise standard weight.
The standard weight used for calibration is defined based on the gravitational force value of 32.17405 ft/sec² (9.80665 m/sec²), the standard gravity. This ensures that the mass is measured accurately according to this gravitational reference when the scale is calibrated.
Before diving into the details of scale calibration, let’s first consider the factors that can affect the accuracy of the calibration process.
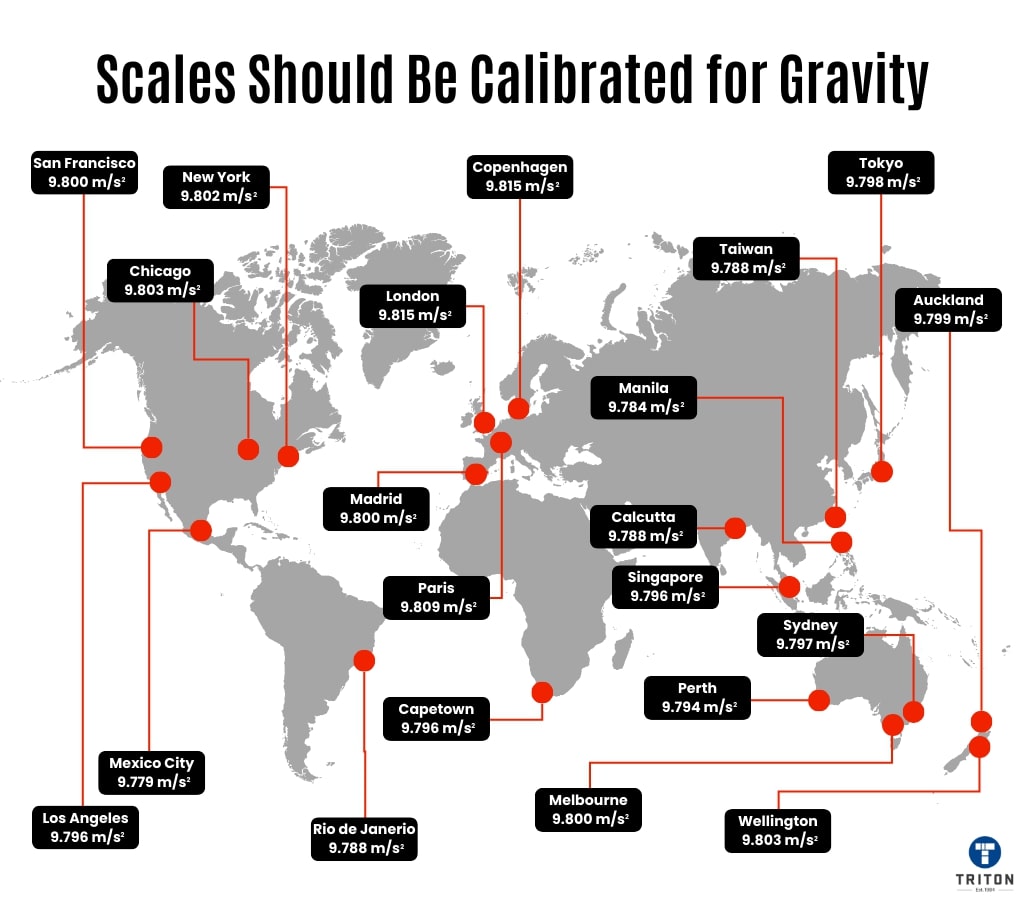
One lesser-known but important factor affecting scale accuracy is the variation in Earth’s gravity across different locations.
For instance, a scale calibrated in one location might not provide accurate readings if moved to a different area with a slightly different gravitational force.
While this may not be significant for everyday measurements, gravity becomes a factor for sensitive measurements.

For example, a 100 kg object in Tasmania would weigh approximately 200g more than in Queensland due to the difference in gravitational force (Tasmania: 9.780 m/s², Queensland: 9.805 m/s²). This highlights the importance of calibrating the scale at its final location or using a scale with a gravity compensation feature.
Accuracy of weighing scales is also susceptible to environmental and operational factors that can impact their accuracy over time:
Now let’s see How to Calibrate Digital Scale Using a Calibration Weight
Calibration weights are precision weights certified to specific mass values. They are classified by NIST, ASTM, and OIML standards, ranging from highly precise E1 and Class 000 weights for labs to less accurate M3 and Class 7 weights for industrial use. Calibration weights are made from materials like stainless steel, brass, and cast iron, and they must be handled carefully (wear gloves when using them) to maintain precision. Calibration weights are commonly available in weight, from 1g to 20kg, depending on the scale’s requirements. Weights as small as 0.05 mg or as large as 5 tons are also available for calibrating specialised scales.
Proper calibration starts with careful preparation.
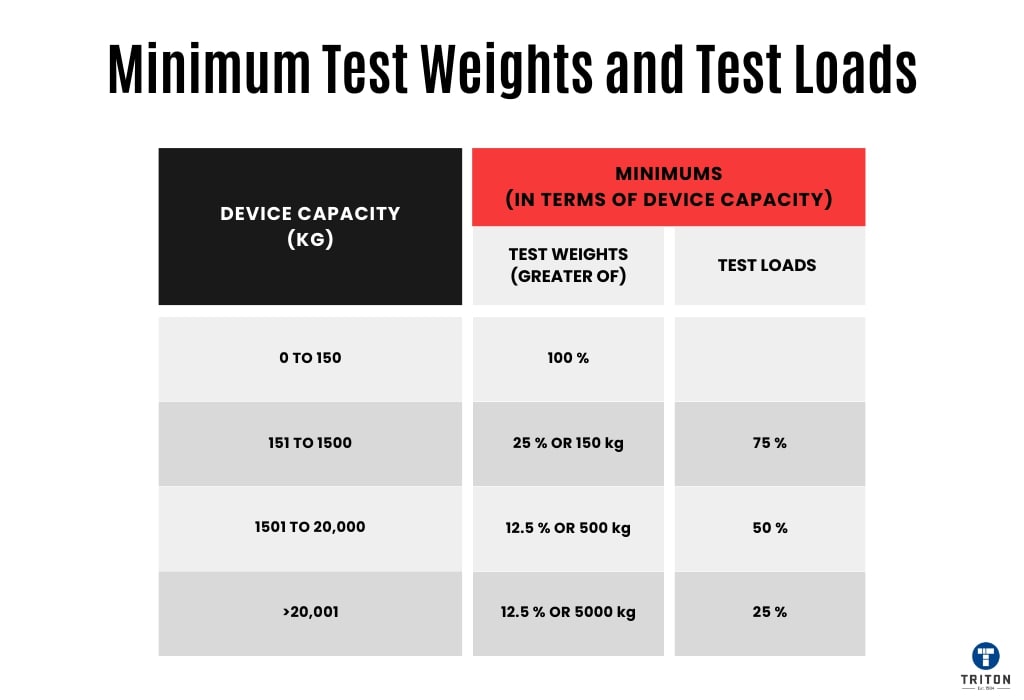
A common question around the range of test weights. NIST recommendation depends on the device’s capacity. For example, if the scale capacity is 150 kg, you should test from zero to the full capacity using calibration weights. For scales measuring up to 1500 kg, NIST requires you to test up to 25% with calibration weights and up to 50% with test loads.
The term “test load” refers to the total weight used during a test, including the calibration weight and the additional load applied. The additional load can be created by measuring the weight of an assortment of materials against a reference weight. |

Keep detailed records of each calibration. Include test load values, errors, and adjustments in your records. Maintain a log or tag on or near each device with the latest calibration date, technician’s ID, and the next due date. These records are required for compliance audits.
The calibration frequency for a scale depends on its usage and environmental exposure. While most jurisdictions require at least annual recalibration, more frequent checks, such as every six months, may be needed for heavily used or exposed scales. Regular inspection and maintenance, including levelling, zero adjustments, span checks, and responsiveness tests, are recommended to ensure accuracy between calibrations.
You can tell that a calibration has failed if the scale’s readings differ significantly from the known values of the calibration weights beyond the allowed tolerance.
Signs of a failed calibration include
If the errors exceed the scale’s maximum permissible error (MPE), or if there are issues like hysteresis (differences in readings when weights are added or removed) or linearity problems (inconsistent accuracy across the scale’s range), the calibration is considered unsuccessful.
Calibration tolerance is the allowable deviation from a specified value during scale calibration. It’s the range within which your scale’s readings can vary from the exact weight and still be considered accurate. The International Society of Automation (ISA) defines it as the “permissible deviation from a specified value,” expressed in measurement units, a percentage of the span, or a percentage of the reading.
Span is the difference between the scale’s maximum and minimum measurable values. For example, if a scale can measure from 0 to 100 kilograms, the span is 100 kilograms. It represents the total range of weights that the scale can measure. |
When calibrating a scale, the tolerance is how much the displayed weight can differ from the true weight of the calibration weight. While it’s ideal for the scale to match the exact weight, tolerance levels provide a realistic range within which the scale’s measurements are acceptable and won’t negatively impact your operations.
Though tolerance can be expressed as a percentage, it’s preferable to calculate it directly in measurement units to avoid potential errors from additional calculations.
Manufacturers usually provide accuracy and tolerance specifications for your scale but don’t rely solely on these. You should also consider:
Let’s say
Your calibration tolerance should be set within the range defined by the process requirement of ±5 grams and the weighing scale tolerance of ±0.25 grams.
You should also apply a 4:1 accuracy ratio to reduce the risk of compromising the calibration. What does this mean?
Simply put, divide the required process accuracy by 4, resulting in ±1.25 grams, which should be the accuracy of your scale.
To properly calibrate the scale, the accuracy of the calibration weight should be at least one-fourth of the scale accuracy or ±1.25 grams divided by 4, which gives you ±0.3125 grams. Go finer if you can.
In this article, we have delineated the process for calibrating weighing scales. There are five main ways in which you can calibrate your weighing scales. The method you choose will depend on your use case.
Type of Weighing Scale Calibration | Description | Some Use Cases |
|---|---|---|
Traceability to a National Standard | Calibrate the weighing scale against a reference standard traceable to a national standard. | Pharmaceutical Manufacturing, Aerospace Industry, Medical Device Manufacturing, Quality Control in Manufacturing, Legal Metrology
|
Inter-laboratory Comparisons | Compare measurements from the device with those from another lab using the same or similar equipment. | Food Safety Testing, Clinical Laboratory Diagnostics |
Self-Calibration | The device calibrates itself by comparing its measurements to its internal standard values.
| Retail Scales in Supermarkets, Industrial Scales for Manufacturing, Jewellery Weighing Scales |
Reference Material Calibration | Use reference materials with known values to calibrate the device | Educational Laboratory Experiments, Forensic Laboratories, Chemical Analysis |
Accredited Calibration | Have the device calibrated by an accredited third-party laboratory | Medical Device Manufacturing, Pharmaceutical Quality Assurance, Aerospace Industry Standards |
In conclusion, proper calibration of digital scales maintains the accuracy and reliability of your measurements. By following the steps outlined in this guide and understanding the factors affecting calibration, you can ensure that your scales perform optimally.
In Australia, digital scales used for trade must comply with the National Measurement Act 1960 and the National Measurement Regulations 1999. The NMI is responsible for ensuring that all measuring instruments used in trade comply with the standards set under the National Measurement Act 1960 and the National Measurement Regulations 1999.
In New Zealand, the term used is “Trade Measurement Certification.” This process is regulated by Trading Standards, a part of the Ministry of Business, Innovation and Employment (MBIE). The certification ensures that measuring instruments, such as scales, comply with the Weights and Measures Act 1987, making them legal for trade use.
In Europe, digital scales must adhere to the Measuring Instruments Directive (MID) 2014/32/EU. Scales used for trade in Europe must carry the CE and relevant metrology marks.
Legal-for-Trade Calibration ensures that scales meet regulatory accuracy standards for commercial transactions. Once calibrated and verified by an authorised entity, the scale is certified for trade. Regular inspections and re-verification are required in both regions to maintain compliance.
In Australia, the term “NMI Trade Verification” is commonly used for Legal-for-Trade Calibration. In New Zealand, the term used is “Trade Measurement Certification.”
Yes, if you use your scale for commercial purposes, such as weighing products for sale, you need legal-for-trade calibration.