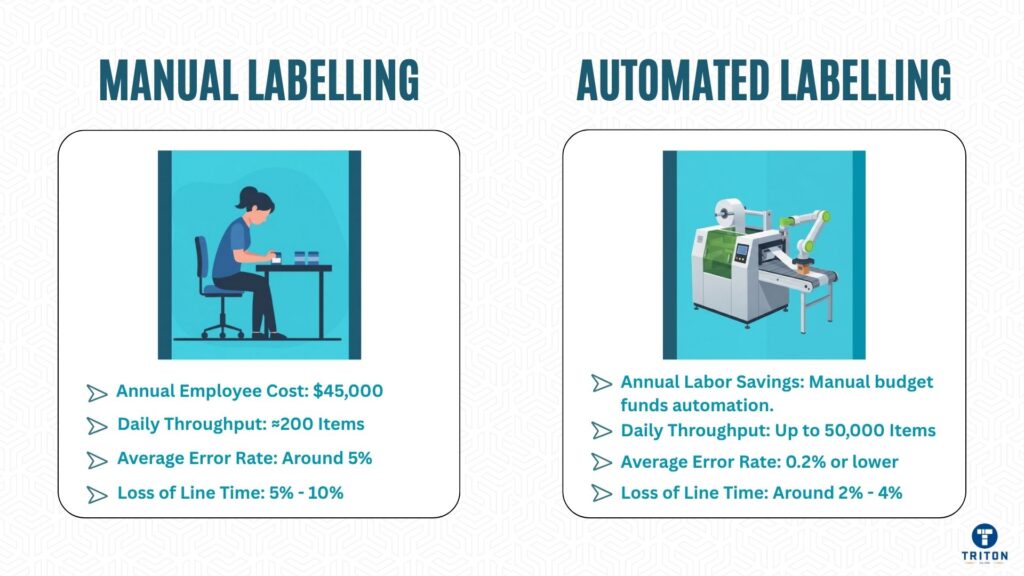
Manual labelling costs a whopping $45,000 a year per employee.
But that’s not the only expense.
There are the hours spent fixing mistakes on top of that. The numbers increase because each worker can only label around 200 items daily. Meanwhile, an automated system can handle up to 50,000 items at the same time.
Most managers know these numbers, yet they still hesitate. And that’s understandable.
Upgrading to automation demands a significant upfront investment, typically between $20,000 and $100,000, and can also disrupt existing workflows that have taken months to get right.
It’s a fair question: will a machine match human accuracy on decisions that matter?
That hesitation is reasonable enough. But holding back will likely cost much more than the upgrade itself.
This guide will walk you through the shift from manual to automated labelling, without causing a fuss for your daily operations.
We’ll show you how to assess your process, pick the right technology, get your data in order, and deploy systems that deliver real results. Most businesses have 95% accuracy within the first quarter and have paid back their investment within six months.
The complete transition, from initial assessment to steady-state automation, usually takes three to six months.
And the best part? You’re already funding it. The budget you’re currently spending on manual labelling becomes the capital that drives automation forward.
Automation brings speed, consistency, and control. It eliminates human work’s variability, cutting error rates down dramatically. Some businesses have reported a 70-85% reduction in mislabelling incidents.
Throughput shoots up. One envelope-printing operation hit 45 labels per minute and saw a full return on investment within eight months.
A mid-sized packaging business relied on two operators to do manual envelope labelling.
Each worker could apply roughly 240 labels per hour, which meant the total output was capped at about eight units per minute. Fatigue and inconsistency caused an average of 5% placement errors – roughly 1 in every 20 envelopes needed rework. Every mistake costs them time, wasted labels, and delayed dispatches.
After they installed an automated print-and-apply system, throughput surged to 45 labels per minute, and they got over 2,700 labels correctly placed every hour with 99.8% accuracy. The new setup could handle six different SKUs seamlessly, maintaining precision across three daily shifts.
Once stuck in repetitive work, labour was reassigned to inspection and logistics, reducing manual handling hours by nearly 70%.
Within eight months, they had fully recovered their investment and labelling-related downtime dropped by 63%, and customer complaints about misaligned or unreadable labels fell by more than 90%.
What started as a cost-saving upgrade became a cornerstone of operational reliability and quality assurance.
Labour costs fall as staff move on to higher-value tasks, scrap and rework decline, and integration with ERP and WMS systems ensures data accuracy, eliminating manual entry errors.
Automated systems add compliance and traceability in regulated sectors through audit logs, barcode verification, and digital approval trails. Most importantly, they scale effortlessly – new SKUs or production increases no longer mean extra staff.
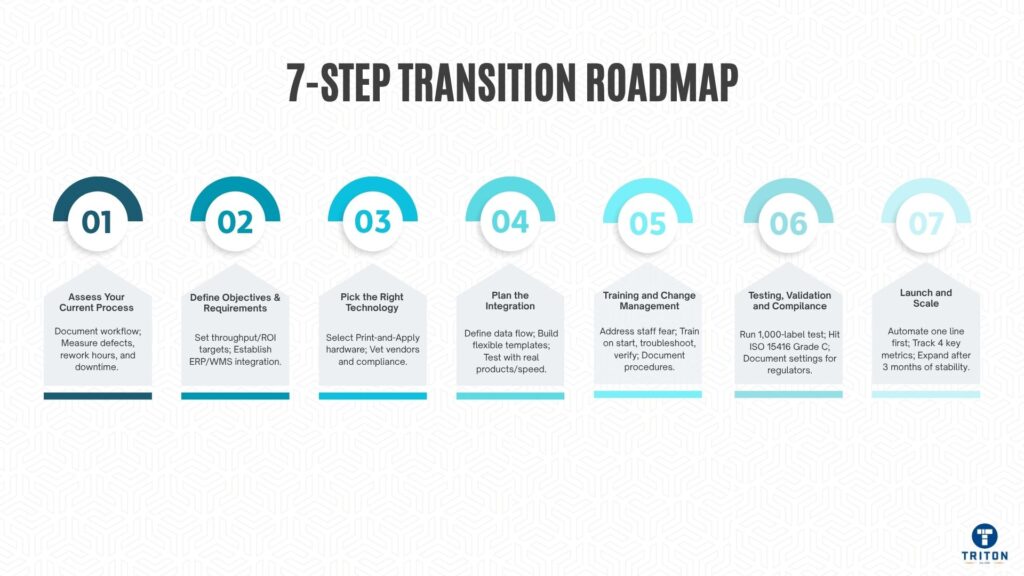
Automate only what you’re familiar with. Document the workflow – from label creation and approval to printing, application, and inspection. Identify delays, rework loops, and bottlenecks.
Measure defects per thousand, rework hours, and downtime from label problems. All these costs add up: labour waste, production stoppages, and penalty charges from shipment errors. Facilities usually lose 5-10% of line time fixing label issues.
Get an audit checklist going that covers:
Get production, quality, and IT working together. Each team is likely to expose problems that the others didn’t notice.
Set targets before you start. Decide on your throughput, defect rate, and ROI window.
Identify which label families to automate first – product, pallet, shipping, or UDI. Each requires different formats and adhesives.
Establish your integration boundaries. Will automation link to your ERP, WMS, or MES? Will it replace or complement manual stations? The answers will shape your implementation plan.
Get a single database going – all systems must be able to pull from it. Automation fails when data conflicts or contains errors.
Hardware and software choices are crucial.
“Print-and-apply systems” combine printing and application in one motion, maximising throughput. Automated applicators are perfect for high-speed, fixed-position labelling when printing happens elsewhere. Vision and verification systems inspect each label for accuracy, alignment, and barcode readability, rejecting non-compliant units immediately.
Choose print technology based on durability. Thermal transfer works for long-life or high-temperature applications; direct thermal suits short-term use with limited exposure.
Test materials under production conditions. Heat, humidity, or curved surfaces affect adhesion. Get suppliers involved early to choose the right combination.
Vet vendors over their ability to support you, their experience integrating systems, and industry compliance records (GS1, UDI, ISO). Any high-end system will fall apart when the support isn’t up to scratch.
Get a clear picture of your data flow. Stick with the tried and tested interfaces like OPC, REST, or SQL.
Stage | Function | Key Consideration | |
|---|---|---|---|
ERP | Get source data | Get the data in the right format | |
Label engine | Process the rules | Make sure the template logic and validation work | |
Printer | make the label | The print quality and speed need to be right | |
Applicator | apply to product | You need to be able to place it accurately | |
Verification | Check output | What your reject criteria and how fast you can scan are key | |
Feedback | Report status | How long it takes to log an error is vital |
Build templates that can handle product variations. If you’ve got 20 SKUs, then you’ll likely need 20 different label formats, unless you can standardise where the fields are and let the software swap out the data.
Retailers won’t accept deliveries if the barcodes aren’t in the right place, not just if the numbers are wrong.
Test it out with your actual products at normal production speed. Suppliers often show off their systems with ideal samples on a clean table. Your environment is dirtier, your staff are rushed, and your boxes will be dented on their way in. Run at least 500 units before you commit.
Budget 2 weeks for setting up and training. Systems that promise “plug and play” still need some network configuration and template design, and the operators need to get familiar with the system. And because staff turnover is always an issue, you must document every setting and procedure.
Automation projects usually get bogged down by staff resistance. They either think they’ll lose their jobs or that the system will break and they’ll be blamed.
Address this straight off.
Tell them that the automation will handle the tedious repetitive tasks and let them focus on quality control and problem-solving.
Train the operators in 3 parts.
First, get them to the point where they can start jobs, load materials and read the status lights.
Second, they need to be able to troubleshoot – clear jams, adjust sensors, and spot the error patterns.
Third, teach them how to do quality verification – look at the barcode grades, check the alignment and log the rejections. Budget at least 3 days for the initial training and then do weekly reviews for the first month.
Get some of your more experienced staff to go through the line before you do the full rollout. They’ll pick up on everything you’ve missed – awkward placement of materials, unclear error messages or maintenance tasks that clash with the production schedule. They can give you feedback that will prevent a redesign after installing the system.
Document everything with photos. Because staff turnover is so high, training has to be repeated every 6 to 12 months. A 3-page laminated guide near the equipment will save you hours explaining things.
Testing tells you if your automation is doing what it was paid to do. The spec sheets claim 99.9% accuracy – but you need to verify that with your products, not the supplier’s samples.
Run 1,000 labels in a row without intervention. Check the barcode readability with a verifier, not a scanner.
Scanners can read damaged barcodes, but customers’ systems won’t. You need to hit ISO 15416 Grade C as a minimum – if you get lower than that, you’ll be charged penalties.
Test the labels after 24 hours, 1 week and 1 month to see if the adhesive is still performing under storage conditions.
Simulate changing over at production speed. Switching between SKUs takes 30 seconds in demos, but it will take 5 minutes with real products and different label sizes. Make sure you time it accurately – it determines your actual throughput.
Document your calibration settings, reject thresholds and maintenance intervals. Regulators are going to want to see that documentation, not just promises. Food manufacturers must be able to trace every label to its production date and batch number. Medical device makers have to be able to prove the system is accurate before they start using it. And pharmaceutical operations need to record every label rejection with the root cause analysis. Get all that started from day one – it will cost 3 times as much to do it later.
Automate one product line that does 40-60% of your volume. That way, you can see a quick ROI without taking too much risk. Run in parallel with manual operations for 2 weeks – catch all the errors before they reach customers.
Track 4 metrics:
Review them once a week, not every day – you’ll just get worked up over normal fluctuations.
Expect a dip in performance in the first week. The operators are still getting used to the new workflows, and there will be some unexpected issues – label roll jams, sensor misalignment or network timeouts.
Write down every problem with time, cause and solution. Some patterns will emerge after 50-100 incidents and show you whether it’s the equipment, the setup or the training causing the issues.
Expand after 3 months of stable operation. Stable means you’re meeting your throughput targets 95% of the time, and the reject rate is below 0.5%. Copy the configuration, including the little things like label roll orientation or sensor height. Changing even the most minor details’ll cause new problems that will delay the ROI.
Automation will fall apart without proper monitoring. Performance will drop gradually – a 0.1% weekly reject rate will increase to 5% losses within a year.
Get some dashboards to track labels per minute, reject counts by SKU, uptime percentage and maintenance frequency. Review them each week. Compare the current performance to the baseline from month one. If the reject rate increases above 0.3% from baseline, then the system has likely drifted, components are worn, or the material has changed.
Analyse Patterns, Not Just Numbers.
Look at how shifts, operators, and the product impact overall performance. The second shift is often the worst because of tiredness, rushing, or inadequate lighting – these are the usual culprits. Certain SKUs may stress the system more because of things like label size, adhesive type or application surface.
Talk to the operators.
They’ll often notice sensor alignment problems or print quality issues before the metrics start flagging up problems.
Schedule maintenance instead of just plodding through on calendar dates. You should replace printheads after every 1 million impressions or when the print density drops below spec. Give those sensors a clean weekly if things get dusty around there, once a month otherwise.
Log every little intervention with the date, symptom, and what you did to fix the problem. This helps predict failures before they bring production to a grinding halt.
Add more printers as the volume grows. It’s cheaper to add a second one than replace the whole system. Faster applicators will pay for themselves within a few months if that’s where the bottleneck is.
Most automation failures boil down to five basic errors:
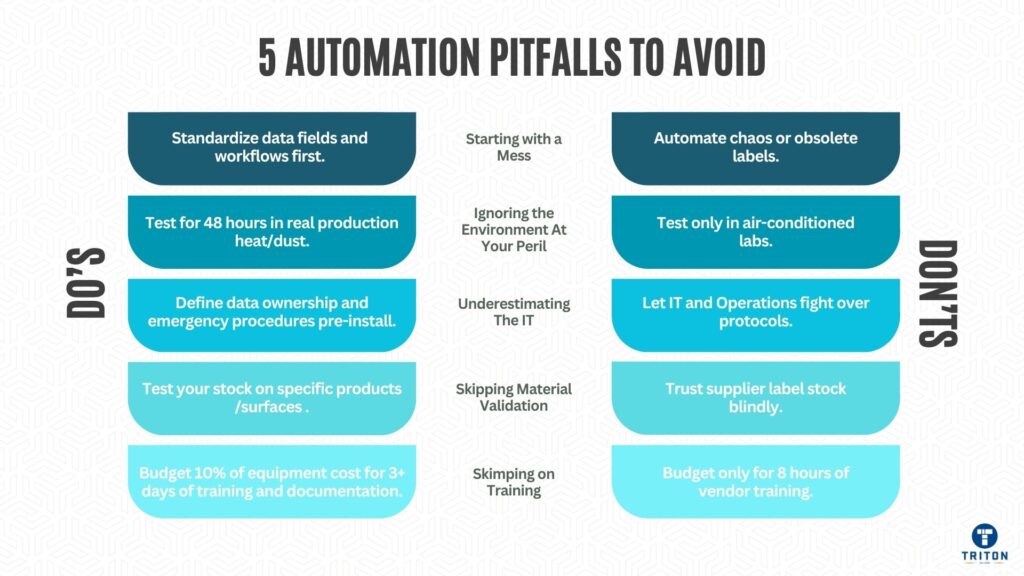
Automation makes whatever chaos exists worse – it scales faster than order. Standardise your label formats, data fields & approval workflows before you start automating. One manufacturer automated 15 label variants, only to find 12 of them were obsolete. Get your act together before wasting money on automation.
Heat above 35 degrees softens adhesives, and humidity under 30% creates static that jams the labels. Dust clogs sensors in no time. Test your equipment in real production conditions for at least 48 hours to see how it performs. Those air-conditioned labs don’t give you the real picture.
IT and operations speak different languages – IT wants secure, documented APIs, whereas Operations wants changes implemented ASAP, not in weeks. Get data ownership, update protocols, and emergency procedures sorted out before installation. You don’t want to argue over thousands of dollars an hour in production downtime costs.
Label stock recommended by the supplier? Forget it. It won’t stick to curved bottles or work on cold surfaces. Test your stock under production conditions – temperature cycling, abrasion, and ageing – before ordering 100,000 rolls.
Those equipment vendors only give you 8 hours of training, but you’ll need three days plus ongoing support. Operators will blame the system for problems they create if they’re not appropriately trained. Budget 10% of the equipment cost for training and documentation.
Don’t just look at purchase price – factor in installation costs (15-25% of equipment cost), commissioning (at least one week), training, consumables (printheads, ribbons, labels), service contracts (10-15% a year), and getting it networked.
Calculate returns in four main areas. Labour savings: multiply hours saved per shift by your loaded labour rate. Waste reduction: count rejected products, waste labels, and rework time at the current cost. Throughput gains: calculate revenue from additional capacity. Compliance improvements: Estimate penalty avoidance and save audit preparation time.
Siemens managed to get their print time down to 0.3 seconds per unit from 8 seconds, and recovered the investment in 4 months. Another place that processes 45 units a minute paid back within 6-8 months. These examples have one thing in common – they automated high-volume, repetitive tasks where manual labour was holding back production.
Calculate the payback period:
Payback Period = Total Investment ÷ Annual Net Savings
Shooting for 12-24 months max. If it’s longer than that, you’re not processing enough volume or the system is overly complicated for your operation.
ROI goes beyond the numbers. Automation gets rid of all the arguing over who messed up what shipment. Traceability records prove compliance during audits. Changeover speed lets you do smaller batch sizes, lowering inventory costs. Staff retention goes up when repetitive tasks disappear.
Manual labelling is a brake on growth. Errors pile up. Training walks out the door when staff leave. Compliance gaps get wider.
Automation fixes these problems if you do it methodically. Audit your processes, set targets, pick equipment that fits your volume and product mix, test thoroughly, train operators till they get it, and validate performance before a full rollout.
You see results within weeks – fewer rejects, faster changeovers, and consistent output regardless of who’s operating the thing. Track your metrics proving ROI, then roll it out across more lines.
Head on over to Triton Store to check out Triton’s automated labelling systems.